Dieses kurze Tutorial ist aufgrund von vielen internationalen Besuchern auf englisch. Das Meiste ist jedoch den Screenshots zu entnehmen.
How to connect an Elegoo Saturn 4 Ultra Printer into a Smarthome / Openhab
My 3D-Printer from Elegoo is in the shopfloor in the basement of our house. Because of that, sometimes i couldn’t hear the beepingsound from it, when it has finished a print. So there must be a way to bring it into my smarthome and NOT modify the firmware on the device.
The software chitubox comes with printermanagement in the actual version and there you can see the actual printstatus, but it comes only on a PC and is not working on a smartphone remotly. But the software itself helped my finding a way to connect the statusmessages into my Openhab system. By looking into the datapackages with wireshark, I could see some websocket traffic to the printer and it responded with a long status json with all the needed informations in it.
Openhab itself could not connect to websockets as far is I found out, so I had to use Node-RED for this task.
I just will show my configuration quickly, mostly with screenshots because its self explaining.
Also I just show the Node-RED part, because what you want to do with those data in openhab is your thing 🙂 I build a rule for sending pushmessages to my smartphone in openhab and calculate the percentage to show in the UI, but feel free to do anything you want to, because there is a lot of data in that websocket package.
I think you could use that with home-assistant and a lot of other home automation systems too. Node-RED is only the connector here to get the informations into openhab, so if your home automation system supports websockets by itself, you could just use it directly.
Node-RED configuration example
So at first you had to have a Node-RED instance with following blocks:
- Websocket (default installed)
- Parsers json (default installed)
- Function-Block (default installed)
- Openhab-Blocks (I used node-red-contrib-openhab3)
Also if you want to connect everything to openhab, you could create your items there. By setting up a debug node in Node-RED in between the JSON-parser and the functionblock you could see the complete data sended by the Saturn 4 Ultra.

This is the complete flow. At first you set up the websocket connection. Then you parse the JSON into a JS-object. After that you can spread that message up to seperated items with the function block and send it to the openhab instance / items.
In this example I extracted the actual layer, total layers, filename and also the temperature of the UV-lightsource. There are much more values you could extract, but those are the most needed for me as status informations and pushmessages in openhab.
Configuration Websocket Node
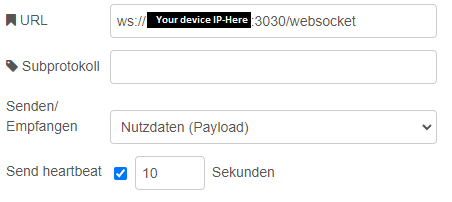
By doubleclicking the websocket-node you could open the configuration. There you set it up as showed by the screenshots.

By clicking the plus-button you could add the connection. You can copy the values from the screenshot and just put in the ip-address of your Saturn 4 Ultra in that blacked out spacer.
I suggest you to set up a static address for your printer in your DHCP-Server / router, so that you have to do this only one time as the ip-address didn’t change after setup.

With the checkbox for the heartbeat, you could set up a reconnect for the case your saturn 4 ultra goes offline.
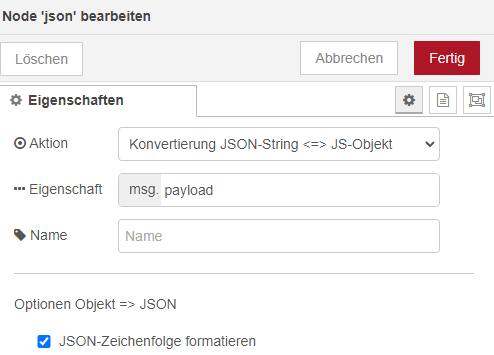
Configuration JSON-parser
Just set the checkbox and convert the json-string into js-object.

Configuration Function-node
At first change the number of outputs to four. You could find this seting in the „setup“ tab.

Then go to function tab and put in the following code:
var out1 = { payload: msg.payload.Status.PrintInfo.CurrentLayer };
var out2 = { payload: msg.payload.Status.PrintInfo.TotalLayer };
var out3 = { payload: msg.payload.Status.PrintInfo.Filename };
var out4 = { payload: msg.payload.Status.TempOfUVLED };
return [out1, out2, out3, out4];
Now you only have to connect the outputs to your smarthome nodes, in my case openhab, as seen in the screenshot on top of this blogpost. Tutorials for configuring your smarthomesystem into Node-RED you could find in the internet.
Thats it, deploy your flow and you are ready to go 🙂
Have fun! And as always if there are any questions, feel free to join the discordserver 🙂

